Ultimate Kilimanjaro Packing Tips
Everything You Need for a Successful Climb
These Kilimanjaro Packing Tips will not only save you from a miserable struggle but can also contribute to an enjoyable Mount Kilimanjaro climbing experience.
If you’re planning to tackle Africa’s tallest peak, these Kilimanjaro packing tips will help you navigate the mountain’s diverse climate zones, manage weight limits, and prepare for every challenge the trail throws your way.
Table of Contents
ToggleWhy You Need these Kilimanjaro Packing Tips
Mount Kilimanjaro is unique because you pass through five different ecological zones—from tropical rainforest to arctic summit. This means your climbing gear needs to adapt to the changes in the zones, be lightweight, and layered. Improper packing can lead to discomfort, exposure, or even failure to summit.
Before your climb, your guide will check the gear that you will have for the climb. And each day while you are on the mountain, your head guide will brief you on the next day’s logistics and advice you on what to wear and pack. Knowing these tips ahead of time will help you have the right items.
Kilimanjaro Packing Tips: Essential Principles
- Master the Layering System
You need to be able to adapt to rapid temperature changes. Layering allows you to regulate your body temperature efficiently and stay comfortable from start to summit.
- Respect the Porter Weight Limits
Your main duffel bag, carried by porters, must not exceed 20 kgs. Your daypack should be minimal, just carrying the daily essentials.
- Waterproof Everything
Rain is common in the lower zones. Use dry bags or plastic bag liners to protect your gear and keep your clothing dry. At Kili Highlands Explorer, we ensure this for all our clients.
- Choose Quality Over Quantity
Every item should earn its place. Invest in high-quality, functional gear that can withstand the elements. Some of the brands recommended for Kilimanjaro climb gear are: KArc’teryx, The North Face, Patagonia, Mountain Hardwear, Marmot, REI, Berghaus and Under Armour.

Pro Tips for Efficient Kilimanjaro Packing
These Kilimanjaro Packing tips focus on maximizing space, staying organized, ensuring your gear is ready for the challenge, and being prepared for on-the-ground logistics.
- Label Everything: To avoid losing gear in group settings.
- Why this is crucial: On Kilimanjaro, you’ll be part of a team with guides, porters, and potentially other climbers. Everyone’s gear will likely look similar, especially duffel bags and stuff sacks. During daily camp setups and breakdowns, gear can easily get mixed up or misplaced, particularly in the hustle and bustle.
- How to do it effectively:
- Permanent and Visible Labels: Use permanent markers to clearly write your name (and perhaps a unique identifier like your initials or a small symbol) on all your bags, stuff sacks, and even individual pieces of gear like water bottles and trekking poles.
- Multiple Locations: Label each item in more than one place if possible. For example, put a label on the top and side of your duffel bag.
- Consider Color-Coding: If you have multiple stuff sacks, using different colored sacks in addition to labels can help you quickly identify what’s inside.
- Don’t Rely on Tags Alone: Tags can get torn off. A permanent marking directly on the fabric or item is more reliable.
- Benefit: This simple step significantly reduces the chances of your valuable gear going missing or getting mixed up with someone else’s, saving you time, stress, and potential inconvenience during your climb.
- Use Compression Sacks: To save space and stay organized.
- Why this is essential: Space is at a premium when packing for a multi-day trek like Kilimanjaro. Porters have weight limits of 20kgs, and a well-compressed pack makes their job easier and safer. Additionally, using compression sacks helps organize your gear into manageable categories.
- How they work: Compression sacks have straps on the outside that allow you to cinch down the contents, reducing their overall volume. They are particularly effective for bulky items like clothing (fleece jackets, down jackets), and sleeping bags (though dedicated sleeping bag compression sacks are often used).
- How to use them effectively:
- Categorize Your Gear: Use different compression sacks for different types of clothing (e.g., warm layers, base layers), toiletries, and other items. This makes it easy to find what you need without unpacking everything.
- Don’t Over-Compress Delicate Items: While compression is great for saving space, be mindful of delicate items that could be damaged by excessive compression.
- Consider Waterproof Compression Sacks: For extra protection against moisture, especially for sensitive items like electronics or extra socks, consider using waterproof compression sacks.
- Evenly Distribute Weight: When packing your duffel bag with compression sacks, try to distribute the weight evenly for the porters’ comfort.
- Benefit: Compression sacks not only free up valuable space in your duffel bag but also help you keep your gear neatly organized, making it easier to find what you need quickly, both for you and your support team.
- Test Gear in Advance: Break in boots and practice layering.
- Why this is non-negotiable: Kilimanjaro presents challenging terrain and varying weather conditions. Untested gear can lead to discomfort, blisters, and even safety issues.
- Breaking in Boots:
- Wear them Regularly: Start wearing your hiking boots several weeks or even months before your trek. Wear them for everyday activities, short walks, and gradually longer hikes.
- Pay Attention to Pressure Points: Identify any areas where the boots rub or cause pressure and try different sock combinations or consider. Moleskin or blister bandages in those spots during your practice hikes.
- Ensure a Good Fit: Make sure your boots fit properly with the socks you plan to wear on the mountain. Your toes should have enough room to wiggle but not slide forward on downhill sections.
- Practicing Layering:
- Understand the System: Familiarize yourself with the concept of layering: a moisture-wicking base layer, an insulating mid-layer (fleece or down), and a waterproof/windproof outer layer.
- Experiment with Combinations: On your practice hikes, try different combinations of your layers in various weather conditions to see what works best for you. This will help you understand how to regulate your body temperature effectively on the mountain.
- Ensure Compatibility: Make sure your layers fit comfortably over each other without being too tight or restrictive.
- Benefit: Breaking in your boots significantly reduces the risk of painful blisters, which can make your trek miserable. Practicing your layering system ensures you know how to stay comfortable in the fluctuating temperatures of Kilimanjaro, preventing overheating or getting dangerously cold.
- Bring Cash for Tips: In small USD denominations for guides and porters.
- Why is this culturally important and logistically necessary: Tipping is a customary and significant part of the income for the hardworking guides, porters, and cooks who support your Kilimanjaro climb. It’s a way to show your appreciation for their efforts and contribution to your experience.
- Why USD and Small Denominations?
- USD is Widely Accepted: While the local currency is Tanzanian Shillings (TZS), US Dollars are widely accepted for tipping in the tourism industry.
- Small Denominations are Easier to Distribute: You’ll be tipping multiple individuals with different roles. Having small denominations ($5, $10, and some $20 bills) makes it easier to distribute the tips fairly and according to the recommended guidelines provided by your tour operator.
- New and Clean Bills: Ensure the USD bills you bring are relatively new, clean, and undamaged. Torn or very old bills (those before the year 2016) might not be accepted.
What to Pack for Kilimanjaro
1.Clothing: Layering is Key to Conquer Varied Conditions
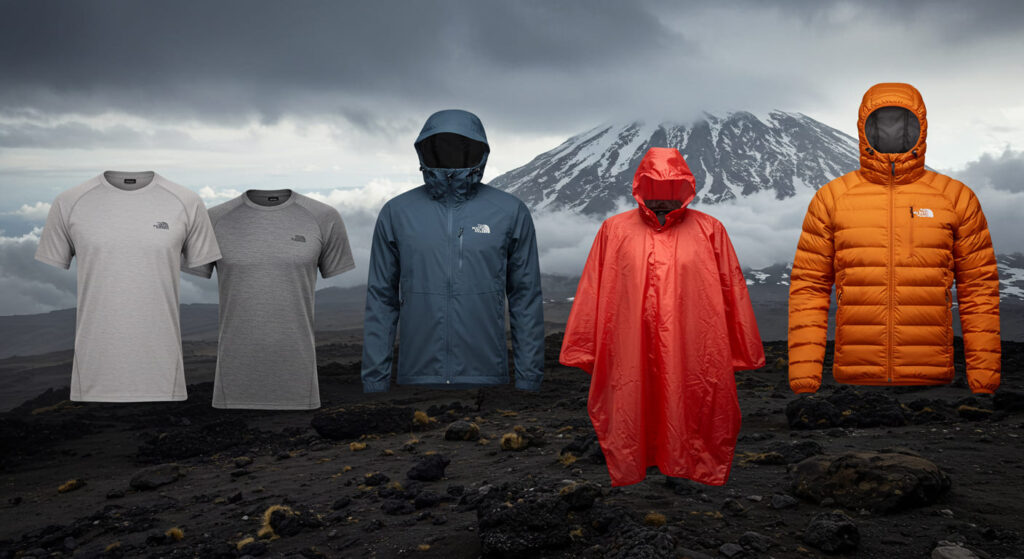
The key to dressing comfortably on Kilimanjaro is the layering system. This allows you to add or remove layers as temperatures and activity levels change throughout the day.
Categories:
- Base Layers (Moisture-Wicking): These sit directly against your skin and wick away sweat.
- Mid-Layers (Insulation): These provide warmth and can be added or removed as needed.
- Outer Layers (Protection): These shield you from wind, rain, and snow.
Pro Tips for Choosing Clothing:
- Base Layers – The Foundation of Comfort:
- Material Matters: Opt for synthetic fabrics (like polyester or nylon) or merino wool. These materials dry quickly and keep you warm even when damp.
Pro Tip: Avoid cotton base layers as they absorb moisture and stay wet, leading to chills. - Consider Weight: Choose lightweight or midweight base layers depending on your personal preference and how easily you get cold. You’ll likely want both long-sleeved tops and long underwear.
Pro Tip: Pack at least two sets so you can change into a fresh, dry set in the evenings. - Fit is Important: Base layers should fit snugly against your skin to maximize wicking efficiency.
Pro Tip: Ensure they are comfortable and allow for a full range of motion.
- Material Matters: Opt for synthetic fabrics (like polyester or nylon) or merino wool. These materials dry quickly and keep you warm even when damp.
- Mid-Layers – Trapping Warmth:
- Versatility is Key: Pack a combination of fleece jackets or pullovers and potentially a lightweight down or synthetic insulated jacket. This allows for flexible warmth adjustments.
Pro Tip: Choose mid-layers with zippers for ventilation to prevent overheating during strenuous hiking. - Consider Weight and Compressibility: For down jackets, look for a good warmth-to-weight ratio and compressibility for easy packing. Synthetic insulation performs better when damp.
Pro Tip: Pack at least one warmer mid-layer for higher altitudes and colder evenings. - Fit Over Base Layers: Ensure your mid-layers fit comfortably over your base layers without restricting movement.
Pro Tip: A softshell jacket can also serve as a breathable and water-resistant mid-layer for milder conditions.
- Versatility is Key: Pack a combination of fleece jackets or pullovers and potentially a lightweight down or synthetic insulated jacket. This allows for flexible warmth adjustments.
- Outer Layers – Shielding from the Elements:
- Waterproof and Windproof is Non-Negotiable: Invest in high-quality waterproof and windproof jackets and pants. Look for features like taped seams and durable, breathable fabrics (like Gore-Tex or similar).
Pro Tip: Ensure your outer layers are large enough to comfortably fit over all your mid-layers. - Ventilation Features: Pit zips on jackets and side zips on pants are crucial for ventilation to prevent overheating and moisture buildup from the inside.
Pro Tip: Test the waterproofness of your gear before your trip. - Durability: Choose durable fabrics that can withstand the rigors of the mountain environment.
Pro Tip: Consider the weight of your outer layers, as you’ll be carrying them in your daypack.
- Waterproof and Windproof is Non-Negotiable: Invest in high-quality waterproof and windproof jackets and pants. Look for features like taped seams and durable, breathable fabrics (like Gore-Tex or similar).
- Other Clothing Essentials:
- Hiking Socks: Wool or synthetic hiking socks are essential to wick away moisture and prevent blisters.
Pro Tip: Pack several pairs (at least one for each day) and consider liner socks for added blister protection. - Warm Hat (Beanie): You’ll lose a significant amount of heat through your head. A warm hat is crucial, especially at higher altitudes and during the evenings.
Pro Tip: Choose a hat that covers your ears. - Sun Hat with Brim: Protect your face and neck from the strong equatorial sun.
Pro Tip: A wide brim offers the best protection. - Gloves or Mittens: Bring both lightweight fleece gloves and waterproof, insulated gloves or mittens for varying temperatures. Mittens are generally warmer for summit night.
Pro Tip: Consider liner gloves for added warmth and dexterity. - Neck Gaiter or Balaclava: Provides extra warmth and protection for your face and neck against wind and cold.
Pro Tip: A versatile Buff can serve multiple purposes. - Underwear: Pack moisture-wicking underwear.
Pro Tip: Quick-drying options are preferable.
- Hiking Socks: Wool or synthetic hiking socks are essential to wick away moisture and prevent blisters.
2. Footwear: Your Foundation for a Successful Trek
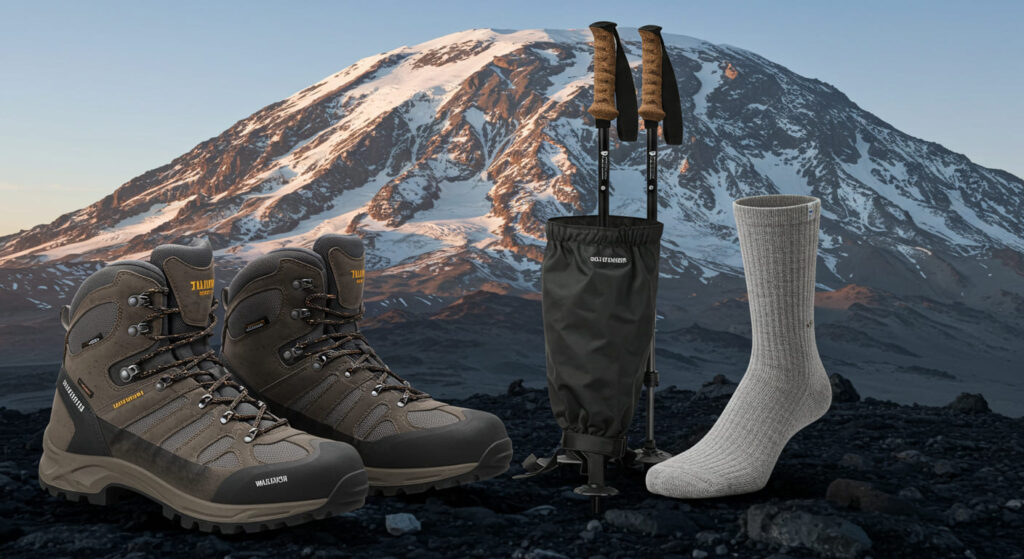
Your footwear is arguably the most critical piece of gear for Kilimanjaro. Blisters and foot problems can quickly ruin your climb.
Categories:
- Hiking Boots: The primary footwear for the trek.
- Camp Shoes: Comfortable shoes to wear around camp after a day of hiking.
Pro Tips for Choosing Footwear:
- Hiking Boots – Support, Traction, and Protection:
- Type of Terrain: Kilimanjaro’s terrain varies from relatively smooth trails to rocky and steep sections. Choose mid-weight hiking boots that offer good ankle support and a sturdy sole with excellent traction.
Pro Tip: High-cut boots provide the best ankle support. - Waterproofness: Waterproof or water-resistant boots are highly recommended, especially for potential rain or snow at higher altitudes.
Pro Tip: Ensure they are also breathable to prevent excessive sweating. - Fit is Paramount: Get professionally fitted for your boots while wearing the type of hiking socks you plan to use on the mountain. Your toes should have enough room to wiggle but not slide forward on downhill sections.
Pro Tip: Break in your boots thoroughly for several weeks or months before your climb to prevent blisters. Wear them for various activities and distances. - Sole Stiffness: A relatively stiff sole provides better support and protection on uneven terrain.
Pro Tip: Test the flexibility of the sole – it should bend at the toes but not excessively in the arch.
- Type of Terrain: Kilimanjaro’s terrain varies from relatively smooth trails to rocky and steep sections. Choose mid-weight hiking boots that offer good ankle support and a sturdy sole with excellent traction.
- Camp Shoes – Comfort After the Hike:
- Lightweight and Packable: Choose lightweight and easily packable shoes like sandals, flip-flops, or lightweight trail shoes.
Pro Tip: Consider closed-toe options for warmth and protection around camp. - Breathability: Allow your feet to air out after a long day in hiking boots.
Pro Tip: Ensure they are comfortable to walk short distances in around the campsite.
- Lightweight and Packable: Choose lightweight and easily packable shoes like sandals, flip-flops, or lightweight trail shoes.
3. Bags: Organizing and Carrying Your Gear
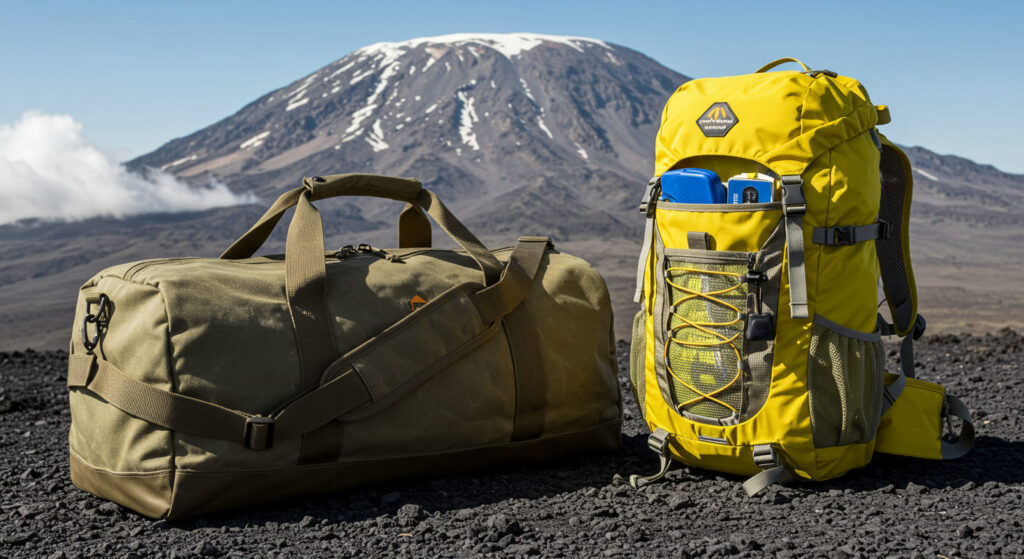
You’ll need two main types of bags for Kilimanjaro: a duffel bag for your main gear (carried by porters) and a daypack for essentials you carry yourself.
Categories:
- Duffel Bag (Porter Bag): For the bulk of your clothing and gear.
- Daypack: For items you need access to during the day’s hike.
Pro Tips for Choosing Bags:
- Duffel Bag (Porter Bag) – Durable and Spacious:
- Size and Capacity: Check the size and weight restrictions with your tour operator. Typically, a 70-90 liter duffel bag is sufficient.
Pro Tip: Choose a bag that is large enough to comfortably hold all your clothing and sleeping bag in compression sacks. - Durability: Opt for a sturdy and water-resistant duffel bag that can withstand being handled by porters and potential exposure to the elements.
Pro Tip: Look for reinforced stitching and durable zippers. - No Wheels: Duffel bags with wheels are not suitable as porters will be carrying them.
Pro Tip: Choose a bag with strong carrying handles.
- Size and Capacity: Check the size and weight restrictions with your tour operator. Typically, a 70-90 liter duffel bag is sufficient.
- Daypack – Comfortable and Functional for Daily Needs:
- Size and Capacity: A 30-40 liter daypack is generally ideal for carrying water, snacks, extra layers, rain gear, camera, and other essentials you need during the day.
Pro Tip: Choose a pack with a comfortable and adjustable hip belt and shoulder straps to distribute weight effectively. - Features: Look for features like side pockets for water bottles, a rain cover (or ensure your pack is water-resistant and pack sensitive items in waterproof bags), and possibly a hydration bladder sleeve.
Pro Tip: Test the fit of your daypack with weight in it before your trip. - Accessibility: Ensure the compartments and pockets are easily accessible while you’re hiking.
Pro Tip: Consider a pack with a top lid and front access for easier organization.
- Size and Capacity: A 30-40 liter daypack is generally ideal for carrying water, snacks, extra layers, rain gear, camera, and other essentials you need during the day.
4. Sleeping Gear: Crucial for Rest and Recovery
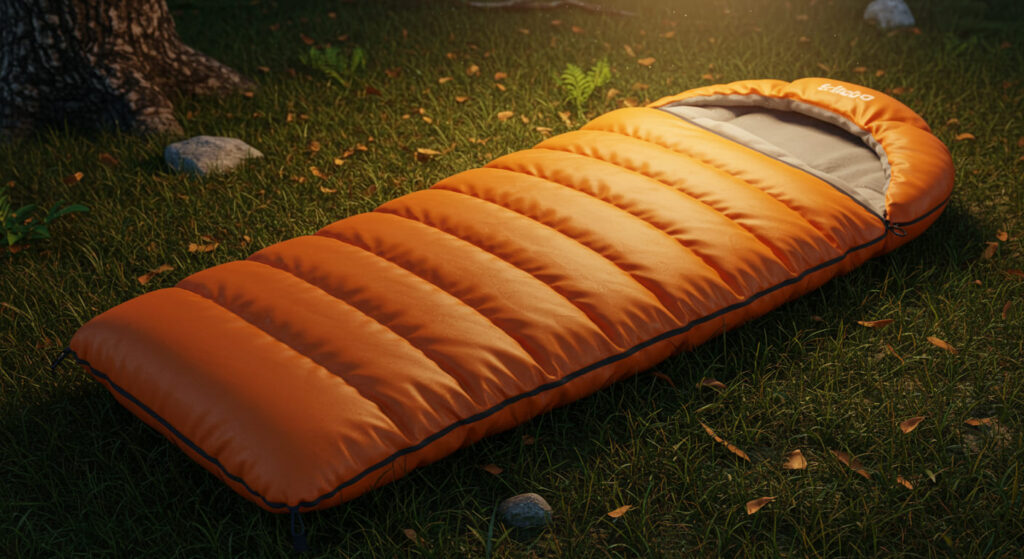
A good night’s sleep is essential for tackling the challenges of Kilimanjaro.
Categories:
- Sleeping Bag: Provides warmth during cold nights.
- Sleeping Pad: Adds insulation and comfort.
- Pillow (Optional): For added comfort.
Pro Tips for Choosing Sleeping Gear:
- Sleeping Bag – Warmth Rating is Key:
- Temperature Rating: Choose a sleeping bag with a temperature rating appropriate for the expected nighttime temperatures on Kilimanjaro. A rating of at least -10°C (14°F) or colder is generally recommended for summit night.
Pro Tip: Consider your personal sleeping temperature – if you tend to get cold easily, opt for a warmer bag. - Fill Type (Down vs. Synthetic): Down is lighter and more compressible for its warmth, but loses insulation when wet. Synthetic insulation performs better in damp conditions but is generally bulkier and heavier.
Pro Tip: If renting, ensure the bag is of good quality and has the appropriate temperature rating. - Shape and Size: Choose a mummy-style bag for maximum warmth efficiency. Ensure it’s the right size for your height to avoid cold spots.
Pro Tip: Consider a sleeping bag liner for added warmth and hygiene.
- Temperature Rating: Choose a sleeping bag with a temperature rating appropriate for the expected nighttime temperatures on Kilimanjaro. A rating of at least -10°C (14°F) or colder is generally recommended for summit night.
- Sleeping Pad – Insulation and Comfort:
- R-Value (Insulation): Look for a sleeping pad with a good R-value (resistance to heat flow). A higher R-value provides better insulation from the cold ground.
Pro Tip: Inflatable sleeping pads offer better insulation and comfort than basic foam pads. - Weight and Packability: Choose a pad that is relatively lightweight and packable.
Pro Tip: Some inflatable pads come with built-in pumps for easier inflation. - Comfort: Consider the thickness and texture of the pad for comfortable sleep.
Pro Tip: Even if a sleeping pad is provided, consider bringing your own for guaranteed comfort and insulation.
- R-Value (Insulation): Look for a sleeping pad with a good R-value (resistance to heat flow). A higher R-value provides better insulation from the cold ground.
- Pillow (Optional) – Personal Comfort:
- Inflatable or Compressible: Choose a lightweight and compressible pillow to save space.
Pro Tip: You can also use extra clothing stuffed into a stuff sack as a makeshift pillow.
- Inflatable or Compressible: Choose a lightweight and compressible pillow to save space.
5. Trekking Essentials: Small Items with Big Impact
These are the smaller, but equally important, items that will enhance your comfort and safety on the trail.
Categories:
- Lighting: For navigating in the dark.
- Eye Protection: Against the strong sun.
- Navigation and Safety: For guidance and emergencies.
- Personal Care: For hygiene and well-being.
- Miscellaneous: Other useful items.
Pro Tips for Choosing Trekking Essentials:
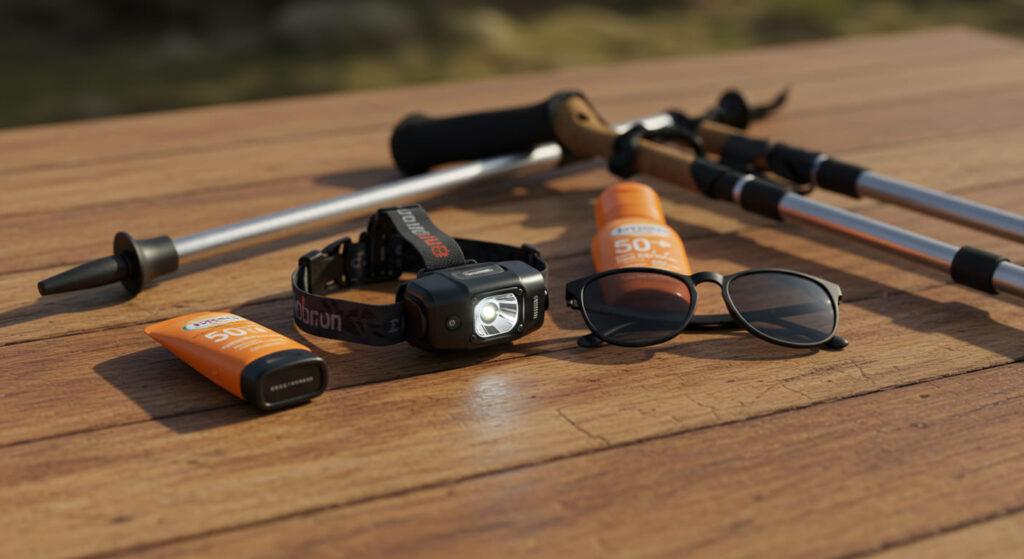
- Headlamp – Hands-Free Lighting:
- Brightness and Battery Life: Choose a reliable LED headlamp with sufficient lumens (brightness) for navigating in the dark, especially on summit night. Ensure it has a long battery life or bring extra batteries.
Pro Tip: Test your headlamp and carry spare batteries in a waterproof bag. - Multiple Modes: Look for a headlamp with different brightness settings and potentially a red light mode to preserve night vision.
Pro Tip: Familiarize yourself with how to operate your headlamp before the trek.
- Brightness and Battery Life: Choose a reliable LED headlamp with sufficient lumens (brightness) for navigating in the dark, especially on summit night. Ensure it has a long battery life or bring extra batteries.
- Sunglasses – Protecting Your Eyes:
- UV Protection: Invest in high-quality sunglasses that offer 100% UV protection (UVA and UVB). The sun’s intensity is much higher at altitude.
Pro Tip: Consider polarized lenses to reduce glare, especially on snow. - Fit and Coverage: Choose sunglasses that fit well and provide good coverage to protect your eyes from all angles.
Pro Tip: Bring a sturdy case to protect your sunglasses when not in use.
- UV Protection: Invest in high-quality sunglasses that offer 100% UV protection (UVA and UVB). The sun’s intensity is much higher at altitude.
- Navigation and Safety – Being Prepared:
- Trekking Poles (Optional but Recommended): Help with balance, reduce strain on your knees, and can aid in uphill and downhill travel.
Pro Tip: Choose lightweight, adjustable trekking poles with comfortable grips and sturdy locking mechanisms. Practice using them before your trip. - Small First-Aid Kit: Carry a basic personal first-aid kit with blister treatment, pain relievers, antiseptic wipes, and any personal medications. Your guides will have a more comprehensive kit.
Pro Tip: Know how to use the items in your kit. - Sunscreen and Lip Balm with SPF: High SPF is crucial to protect your skin and lips from the intense sun and wind.
Pro Tip: Apply sunscreen liberally and frequently, even on cloudy days. - Hand Sanitizer: Important for hygiene on the trail and at campsites.
Pro Tip: Carry a travel-sized bottle.
- Trekking Poles (Optional but Recommended): Help with balance, reduce strain on your knees, and can aid in uphill and downhill travel.
- Personal Care – Staying Comfortable:
- Toiletries: Pack travel-sized toiletries to save space and weight.
Pro Tip: Consider dry shampoo and biodegradable soap. - Quick-Drying Towel: A small, lightweight, and quick-drying towel.
Pro Tip: Microfiber towels are a good option. - Wet Wipes: Useful for freshening up when showers are not available.
Pro Tip: Pack them in a resealable bag.
- Toiletries: Pack travel-sized toiletries to save space and weight.
- Miscellaneous – Useful Extras:
- Water Bottles or Hydration Reservoir: Essential for staying hydrated. Bring at least 2-3 liters capacity.
Pro Tip: Consider an insulated hose for hydration reservoirs to prevent freezing at higher altitudes. - Water Purification Tablets or Filter (Optional): As a backup. Your guides will usually provide treated water.
Pro Tip: Know how to use your chosen method. - Snacks: Pack high-energy snacks like energy bars, nuts, dried fruit, and electrolyte tablets.
Pro Tip: Choose snacks you enjoy and have tested before. - Camera and Extra Batteries/Power Bank: To capture the incredible scenery. Pro Tip: Cold temperatures can drain batteries quickly.
- Small Padlock: To secure your duffel bag if desired.
- Repair Kit (Basic): Duct tape, safety pins, and a small knife can be useful for minor gear repairs.
- Plastic Bags (Various Sizes): For organizing gear, protecting electronics, and packing out trash.
Pro Tip: Consider waterproof stuff sacks for sensitive items. - Comfort Items: Anything small that will make your trek more enjoyable (e.g., a small book, travel journal).
- Water Bottles or Hydration Reservoir: Essential for staying hydrated. Bring at least 2-3 liters capacity.
CONCLUSSION
Packing for Kilimanjaro isn’t just about comfort, it’s about safety, performance, and enjoying one of the greatest adventures of your life. With these Kilimanjaro packing tips, you’ll be well-equipped to face every challenge and reach the summit with confidence.
Ready to climb? Share this guide with fellow trekkers and start checking off your gear list today!